What is your developer-dependent CMS actually costing you? Calculate your costs and get a full report


Introduction
Approvals and Workflows
Collaborate with your team members, improve the quality of your content.
What are Approvals and how do they work?
Say you have multiple editors managing content, often you’ll need to review their work for quality assurance before it’s published to the live site. Approvals allow you to customize this process to increase your collaboration with your team while maintaining the quality of your content.
What does it look like?
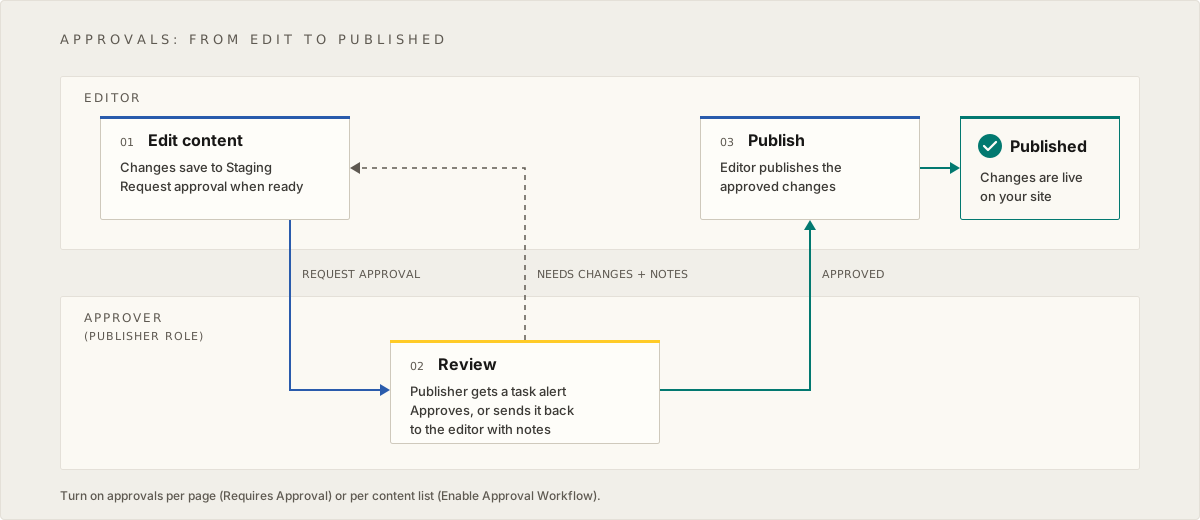
An example Approval workflow would look a little something like this:
- An Editor has set up a new landing page for a website campaign and feel confident the page is ready to go live, so they submit it for Approval
- The Approver, or Quality Checker, would then be notified to review the content in Agility and decide whether the content was ready to be published
- If changes are needed, it can be sent back to the Editor with notes so they can make the necessary changes and request Approval again or, if the Approver is satisfied, they could Approve it.
- Once approved, the Editor can then Publish the changes to your live environment.
Approvals and Nested Linked Content
Since September 23, 2026, publishing a page or content item also publishes its nested linked content by default. When an approved item is published, its nested content goes live with it, including saved changes in that nested content. Review the nested content as part of the approval, not only the item itself. If only the item should go live, the person publishing can tick Publish this item only in the Publish prompt. See Previewing, Publishing, and Content States.
Setting up and enabling Approvals
The first step is deciding what content types will require approvals and enabling them
Enabling Approvals for Pages
1. From the Pages Section in Agility, Select the Page you’d like to enable Approvals for
2. Click the Properties tab in the page's side panel

3. Check Requires Approval
4. Click Apply
Enabling Approvals for Content
1. From the Content Section in Agility, Select the Content List you’d like to enable the Approvals Workflow for
2. Click the Developer Settings tab in the content list's side panel

3. Check Enable Approval Workflow on this list
4. Click Apply
Assigning Approval Roles
Role Types
- Editor - Can only make changes to content and cannot publish content without Approval
- Publisher – Able to Edit content and pages as well as Approve publish requests. Will receive a Task Alert that a change has been made and an Approval has been requested.
- Manager – Can Create and Delete content and pages, while a Publisher could only edit them, and an Editor can only make changes.
How to set them up
1. Click Settings in your Agility Instance
2. Click User Access
3. Click the Edit (pencil) icon next to the user's name

4. Click the Drop-down to select their role

5. Click Save
- You can also click Email User to notify them of the change
Further Reading
Increase collaboration with your team members, while maintaining the quality of your content.
Consider that you have multiple editors managing content. Often, you'll need to review their work for quality assurance. Workflows allow you to customize how your team reviews and publishes content.
An example of content approval workflow:
- A content editor has set up a new landing page for a campaign on their website
- When the editor feels the page is ready, they need to notify their approver to review
- The approver would review the content and decide whether this page should be published or not
- Once the approver is satisfied, they would approve the content
- Approved content can now be published

Example of a content approval workflow on agilitycms.com Select an Image
Adding Approval Workflow Where it Counts
You decide what pages or content types you want to enable a workflow approval on. Enabling this is the first step in setting up workflow approvals. It provides the ability to request, accept, and decline approvals.
The Publishing Workflow within Agility is comprised of three parts:
- Enabling Approval Workflow
- Setting up Workflow Roles
- Setting up Alert Notifications
Enabling Approval Workflow
To enable the Approval Workflow:
- Select the Page or Content Type you want to enable a Workflow Approval on
- Click on Settings
- Click on the

Enabling approval workflows in Agility CMS Select an Image
Setting Up Workflow Roles
Before setting up the Workflow Roles, we will go over the types of roles used for this workflow.
There are 3 general roles that are used in this workflow:
- Editor
- Publisher
- Manager
Editor Role
Editors can only make changes to modules and cannot publish content. Once a change has been completed, they can send a "Request Approval" request to the person (Publisher) who is responsible for approving the changes.

Requesting approval in Agility CMS Select an Image
Publisher
Publishers are able to Edit Content and Pages, and Page Modules (make changes, save, publish, and un-publish). The Publisher will receive an Alert in their 'Tasks' notifications that a change has been made on a module and is requesting approval.

Creating tasks in Agility CMS Select an Image
Manager
The main difference between a Publisher and a Manager role is that Managers are able to Create or Delete Content and Pages, and Page Modules, whereas Publishers can only edit.
Managers can be set up to receive alerts when content has been published.
Setting Up Roles
Agility Users with Administrator access have the ability to change a user's role. To set up or edit a User and their role, go to:
Settings > User Management
Control What Your Users Can Do
You'll want to ensure your editors can't bypass or override your content approval workflow. This is controlled by setting the appropriate roles for your users. You can have full control over who must abide by your approval workflow, and who can override it.
Choosing the right permissions (roles) when adding users gives them a safe and streamlined environment when viewing or editing content. When adding users, you should select the bare minimum role that users will require.
Let's go over some of the best practices when adding new users and permissions in your Agility CMS:
- Adding a user who can only
- Adding a user who should only be able to Edit/Publish Content
- Adding a user who can only manage
Adding a user who can only view Content without Editing/Publishing
Adding a user with the Reader role permission will grant them access into your Agility CMS, but only allow then to view your content without being able to Edit or Publish new content or modify any of your Content Models.

Creating reader roles in Agility CMS Select an Image
Adding a user who should only be able to Edit/Publish Content
Adding a user with the Editor role grants them access to edit and create new items on the site. This user, however, can only save content and not approve or publish items.

The figure above shows a user with the Editor role permission creating a new blog post. Select an Image
Adding a user with the Publisher role grants them access to publish content or pages, in addition to edit access.

Accessing published content in Agility CMS Select an Image
Adding a user who can only manage specific Pages/Content
Sometimes you may want a user to be able to modify some specific content. This can be done by setting a user's role to Reader and setting security roles on the specific page or content item you want them to modify. Let take a look at an example of this.
After setting a user's permission to Reader, you can then grant that user the ability to only manage specific content, for example, within a Blog Posts List or Home Page
Navigate to the Security tab on a Content Type, Page or Page Module and add a new user to the list. This is a list of the users who have specific access to this item.

Adding users who can manage specific content in Agility CMS Select an Image
After selecting a user, You can then select the role you want to give the user, i.e. Publisher.
When the user is logged into Agility CMS with their new User Permission roles, the specific Content or Page(s) will be editable.
Keep Track of Approvals
When an editor requests approvals for content, you'll have a task assigned to you. This allows you to manage your approvals in a central location.
Setting Up Alert Notifications
Agility allows users to set up email alerts to be notified when there are changes made. There are different types of alerts that can be set up.
Here is a breakdown of the most common alert types:
Update: Users will receive an email notification when content has been updated.
Approve: Users will receive an email notification when content changes have been Approved.
Decline: Users will receive an email notification when content changes have been Declined.
Request Approval: Users will receive an email notification when Content is pending Approval (waiting to be approved).
Publish: Users will receive an email notification when content items are published.
To set up Alert Notifications, select the desired Page/Content, then click Alerts. Click on the '+' icon to add a new Alert.

Setting alerts in Agility CMS Select an Image
Next, select the user you wish to add an alert to, then select the alert type you would like to add to the user and click Add Alerts.


Adding users to alter types in Agility CMS Select an Image
On this page