Algolia
Algolia search enables next generation apps with APIs that deliver relevant content in milliseconds.
While Agility CMS allows you to manage and publish content with ease, Algolia helps your users find the content they are looking for.
This guide will walk you through how to set up the integration from start to finish.
Sign up for Agility and Algolia
You'll need to have access to an Agility instance and an Algolia account in order to get started.

Configure your Content in Agility
In Agility, you'll need to have an idea of what content you want to index and have available to your Algolia search results.
The two most common ways you may integrate are:
- Index every page on your website, like a traditional website search. This means you'll be indexing all your pages in your website and you should be using Pages in Agility to manage this.
- Index only certain types of content such as products or other list of content. This means you'll be indexing only certain types of content, and you'll want to initialize these content lists in Agility beforehand so you know what
referenceNamesto look for later (when processing a content change Webhook).
Deploy an API route to Index Content
In order for Algolia to be aware of your content, you must submit content to the index in Algolia. To do this, you'll need to have an API route that can be called by Agility (via a Webhook) whenever content is updated in the CMS.
The role of this API route will be to:
- Check the Webhook payload to determine what content has changed and if this is an event that requires an index update. This depends on your approach of whether you want to index all of your pages or just some specific content types.
- Create, update, or delete the item from the Algolia index.
You'll also need to initialize the index in Algolia so that you can add objects to it.
Example API Route
In the below example, this represents an API route that looks for changes to a specific content type such as an Article. It will only process indexing for articles.
The example provided was built using Next.js, uses the Algolia JS SDK, and uses GraphQL to lookup content from Agility. It adds objects to the index called doc_site.
import algoliasearch from "algoliasearch";
import { client } from 'agility-graphql-client';
import { gql } from "@apollo/client";
import { getDynamicPageURL } from "@agility/nextjs/node";
import { normalizeArticle } from "utils/searchUtils";

//set up the Agolia client and index
const algoliaClient = algoliasearch(process.env.ALGOLIA_APP_ID, process.env.ALGOLIA_ADMIN_API_KEY);
const index = algoliaClient.initIndex("doc_site");

export default async (req, res) => {
    //check the referenceName of the content being updated
    const referenceName = req.body.referenceName;

    //if our content is not an article, do nothing
    if(!referenceName || !referenceName.endsWith('articles')) {
        //kickout
        res.status(200).end();
        return;
    }

    const contentID = req.body.contentID;
    const state = req.body.state;

    //if the article has been deleted or unpubilshed, remove it from the index
    if(contentID && state && state === 'Deleted') {
        await index.deleteObject(contentID);
        return;
    } else {
        //use GraphQL to lookup the details or the article from Agility
        const { data } = await client.query({
            query: gql`
            {
                ${referenceName} (contentID: ${contentID})  {
                    contentID
                    properties {
                        itemOrder
                    }
                    fields {
                        title
                        content
                        description
                        section {
                            contentID
                            fields {
                                title
                            }
                        }
                        concept {
                            contentID
                            fields {
                                title
                            }
                        }
                    }
                }
            }`,
        });

        const article = data[referenceName][0];

        //resolve the URL for the article
        const url = await getDynamicPageURL({
            contentID: article.contentID,
            preview: false
        })

        //format the article into the object we want to index
        const object = await normalizeArticle({
            article,
            url
        })

        //save it in Algolia
        await index.saveObject(object)
    }
    res.status(200).json();
};
Deploying your API Route
Once you have your API route functioning and you are indexing content in Algolia, you'll want to deploy this to a public endpoint so that Agility can call it with a webhook.
Set up the Agility Webhook
Now that you have a deployed endpoint to handle indexing content to Algolia, next you'll need to set up a Webhook in Agility so that Agility can call this endpoint when content changes.
- Go to Settings > Webhooks in Agility CMS.
- Create a new webhook and enter the URL to your API route
- Check only the Receive Content Publish Events option, this will ensure only published content is available to your index. If you want to test this with content that has not been published, you should consider creating a secondary index in Algolia to handle preview content.
- Click Send Test Payload to ensure your endpoint can receive events from Agility.
- Click Save to add your Webhook.
Testing Webhooks via Localhost
One of the challenges with Webhooks is that by default, Agility CMS cannot communicate directly with your localhost app. This can make it difficult to test and debug issues.
One way to get around this is to use a localhost tunnel proxy which can proxy requests to a public endpoint to your localhost so you can run logic locally and debug it. We recommend using the service Ngrok which is free and provides a temporary public URL to proxy to your localhost.
Once you have created an Ngrok Url, you can then add another Webhook in Agility (using your Ngrok Url) which will run code on your localhost when the appropriate events fire.
Verifying your Index
To verify that your logic is successfully indexing content, log in to Algolia and inspect your index(es). Verify the information there is correct. You can also set up a search test within the Algolia app to actually test how the search works against your index.

Build the Search UI on the Frontend
Once you have confirmed your content is being indexed correctly, the last step is to actually provide a frontend UI for your users to input words and query Algolia for the search results.
Alogila offers SDKs in a variety of programming languages/frameworks to help you get started with building a search UI.
An Example
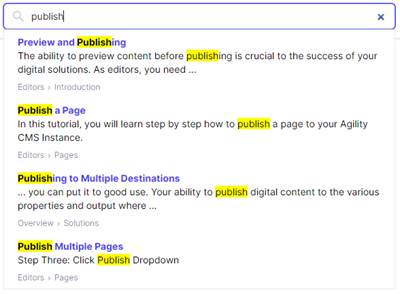
The following example is what an Autocomplete search UI may look like in a Next.js React app.
import React from 'react'
import Link from 'next/link'
import { ChevronRightIcon } from '@heroicons/react/outline'

import algoliasearch from 'algoliasearch/lite';
import { createAutocomplete } from '@algolia/autocomplete-core';
import { getAlgoliaResults } from '@algolia/autocomplete-preset-algolia';
import { renderHTML } from '@agility/nextjs'

const searchClient = algoliasearch(process.env.NEXT_PUBLIC_ALGOLIA_APP_ID, process.env.NEXT_PUBLIC_ALGOLIA_SEARCH_API_KEY);

const Search = () => {
    // (1) Create a React state.
    const inputRef = React.useRef(null)
    const [autocompleteState, setAutocompleteState] = React.useState({});
    const autocomplete = React.useMemo(
      () =>
        createAutocomplete({
          onStateChange({ state }) {
            // (2) Synchronize the Autocomplete state with the React state.
            setAutocompleteState(state);
          },
          getSources() {
            return [
              // (3) Use an Algolia index source.
              {
                sourceId: 'articles',
                getItemInputValue({ item }) {
                  return item.query;
                },
                getItems({ query }) {
                  return getAlgoliaResults({
                    searchClient,
                    queries: [
                      {
                        indexName: 'doc_site',
                        query,
                        params: {
                          hitsPerPage: 4,
                          highlightPreTag: '<mark>',
                          highlightPostTag: '</mark>',
                        },
                      },
                    ],
                  });
                },
                getItemUrl({ item }) {
                  return item.url;
                },
              },
            ];
          },
        }),
      []
    );

    return (
      <div className="aa-Autocomplete" {...autocomplete.getRootProps({})}>
        <form
          className="aa-Form"
          {...autocomplete.getFormProps({ inputElement: inputRef.current })}
        >
          <input
          className="block w-full bg-white border border-gray-300 rounded-md py-2 pl-10 pr-3 text-sm placeholder-gray-500 focus:outline-none focus:text-gray-900 focus:placeholder-gray-400 focus:ring-1 focus:ring-indigo-500 focus:border-indigo-500 sm:text-sm"
           {...autocomplete.getInputProps({})}
           placeholder="Search docs..."
           />
        </form>

        <div className="aa-Panel relative" {...autocomplete.getPanelProps({})}>
          {autocompleteState.isOpen &&
            autocompleteState.collections.map((collection, index) => {
              const { source, items } = collection;

              return (
                <div key={`source-${index}`} className="aa-Source absolute bg-white z-50 border border-gray-300 w-full">
                  {items.length > 0 && (
                    <ul className="aa-List" {...autocomplete.getListProps()}>
                      {items.map((item) => {
                        let description = null;
                        if(item._snippetResult?.content && item._snippetResult.content.length > 0) {
                          let snippetBlock = item._snippetResult.content.find((block) => {
                            return block.data.text.matchLevel === "full";
                          })

                          if(snippetBlock) {
                            description = snippetBlock.data.text.value;
                          }
                        }

                        if(!description) {
                          description = item._highlightResult.description.value
                        }

                        return (
                        <li
                          key={item.objectID}
                          className="aa-Item"
                          {...autocomplete.getItemProps({
                            item,
                            source,
                          })}
                        >
                          <Link href={item.url}>
                            <a className="SearchResult px-5 py-2 block w-full hover:bg-gray-50">
                                <span className="SearchResult__titlee block text-indigo-600 text-sm font-bold" dangerouslySetInnerHTML={renderHTML(item._highlightResult.title.value)}></span>

                                {description &&
                                  <span className="SearchResult__description block text-sm mb-2" dangerouslySetInnerHTML={renderHTML(description)}></span>
                                }
                                <span className="SearchResult__category-section block text-xs font-light text-gray-600">
                                  {item.category} <ChevronRightIcon className="inline w-2"/> {item.section}
                                </span>
                            </a>
                          </Link>

                        </li>
                      )})}
                    </ul>
                  )}
                </div>
              );
            })}
        </div>
      </div>
    );

  }

  export default Search;
Need Help?
Contact us to learn more about this integration and speak with an expert.