If you haven't, and this is your first time hearing about DPR, it is a new approach that aims to reduce build times for teams and individuals building large sites on the Jamstack. It works by separating your site's contents into two distinct parts, critical and deferred.
The critical parts are generated at build time to ensure that your site's contents are readily available to users while the deferred part is loaded on-demand at the first request.
For instance, consider a local news website that has breaking news and some archived news as well.
As the developer, you might prefer to generate all your breaking news pages at build time so that it's available to all your users as quickly as possible.
Then, seeing that the archived news section is rarely of interest to users, it would be ideal to generate those pages only when a user specifically requests for them.
This would ultimately lead to faster build times for your site and an overall better user experience for your users.
The good news is, you can do it with On-demand builders - a special type of serverless functions that helps bring the DPR idea to life on Netlify.
This is what I'd like to show you in practice today. We'll build out the news website, generate all our breaking news at build time and defer the archived news to be generated at the first request using Next.js on Netlify.
If you prefer, here is 1 hour workshop with Joel Varty where we go through the whole set up using Agility CMS:
Set up Next.js
This part is really simple. Here's a great Next.js Netlify starter that was kindly prepared by the wonderful Cassidy Williams. To get up and running in a minute, click the Deploy To Netlify button on the repo and that's it, you're set. The advantage of using this starter is that:
- The starter will be cloned to your personal Github repository.
- The site will be deployed to Netlify and you can interact with it in seconds.
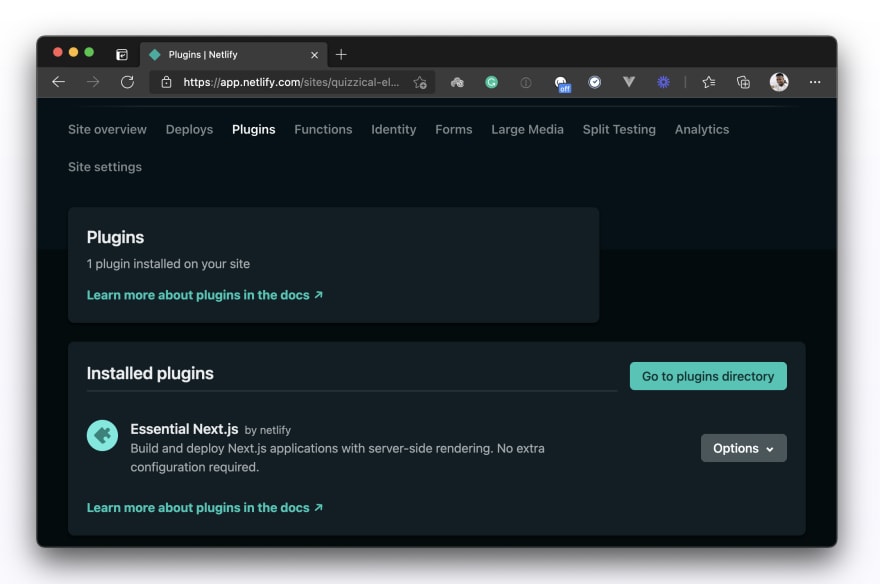
- The Essential Next.js plugin (that will give you access to On-demand Builders out of the box) will be auto-installed on the site for you.
If you deploy the starter to Netlify and switch over to the Plugins tab, you should see the Essential Next.js plugin installed:
If you've cloned this project locally (I hope you did), then you should have a minimal Next.js site that you can run with:
npm run dev
//OR
yarn dev
And you should have the following view on your browser at localhost:3000:
Set up the news data source
Now that we have our Next.js app set up, we need to source our news data from somewhere right? ideally, I would use a content management system for this (maybe I still will) but in the meantime, let's simply fetch it from an external endpoint.
This is what the data would look like:
export const news = [
  {
    id: "1",
    tag: "breaking",
    title:
      "Facebook running special center to respond to content on Israeli-Gaza conflict - Reuters",
    excerpt:
      "Facebook Inc (FB.O) set up a 24-7 special operations center last week to respond to content posted on its platform about the ...",
    content:
      "Streaks of lights are seen from Ashkelon as rockets are launched from the Gaza Strip towards Israel, May 15, 2021. REUTERS/Amir Cohen/File PhotoFacebook Inc (FB.O) set up a 24-7 special operations. Lorem ipsum dolor sit amet, consectetur adipiscing elit, sed do eiusmod tempor incididunt ut labore et dolore magna aliqua. Ut enim ad minim veniam, quis nostrud exercitation ullamco laboris nisi ut aliquip ex ea commodo consequat. Duis aute irure dolor in reprehenderit in voluptate velit esse cillum dolore eu fugiat nulla pariatur. Excepteur sint occaecat cupidatat non proident, sunt in culpa qui officia deserunt mollit anim id est laborum.",
  },
// some more data
]
Create the news page
So we have the data we need for our news site, great!. Next, let's show the news headlines to the users. In the pages directory, create a new index.js file in the pages/news/ directory. In this file, we'll fetch our news data and display the headlines so users can click through to read any news article of their choosing.
// pages/news/index.js
import Footer from "@components/Footer";
import styles from "../news/News.module.css";
import Link from "next/link";

export default function NewsHome({ news }) {
  return (
    <div className="container">
      <main>
        <h1>All News Headlines</h1>
        {news.map((article, index) => (
          <div key={index} className={styles.card}>
            <div className={styles.container}>
              <Link href={`/news/${article.id}`}>
                <a>
                  <h4>
                    <b>{article.title}</b>
                  </h4>
                </a>
              </Link>
              <p>{article.excerpt}</p>
            </div>
          </div>
        ))}
      </main>
      <Footer />
    </div>
  );
}

export async function getStaticProps() {
  const res = await fetch(process.env.DATA)
  const news = await res.json();
  return {
    props: {
      news,
    },
  };
}
The getStaticProps() function runs at build time to fetch our news data and pass it to NewsHome() via props for rendering. Also, you may have noticed that I'm using Next.js's Link component to route to /news/${article.id} when any of the news items is clicked. In accordance with Next.js's pattern of handling dynamic routes, let's create a new [id].js file in the same directory as our index file.
// pages/news/[id].js
import Footer from "@components/Footer";
export default function NewsDetail({ news }) {
  return (
    <div>
      <main>
        <h3>{news.title}</h3>
        <p> {news.content} </p>
      </main>
      <Footer />
    </div>
  );
}
export async function getStaticPaths() {
  const res = await fetch(process.env.DATA);
  const newsItems = await res.json();
  const breakingNews = newsItems.filter((news) => news.tag == "breaking");

  const paths = breakingNews.map((news) => ({
    params: { id: news.id.toString() },
  }));

  /*
  console.log(paths)
  [
    { params: { id: '1' } },
    { params: { id: '2' } },
    { params: { id: '3' } }
  ]
  The paths above will be generated at build time
  */

  return { paths, fallback: false };
}

export async function getStaticProps({ params }) {
  const res = await fetch(`${process.env.DATA}/${params.id}`);
  const news = await res.json();
  return { props: { news } };
}
Here's where the magic happens. The getStaticPaths() function is how we tell Next.js which routes to generate at build time. Here, we are specifically telling Next.js to generate only the breaking news routes by:
- Filtering through all our news items and returning only the items with the
breakingtag (i.e our breaking news). - Generating all the dynamic routes of the breaking news items by looping through our breaking news and returning the paths to the individual pages I want to pre-generate.
- Lastly, we pass the
pathsto the function's return statement along with the fallback value of false. This will cause the site to 404 when a page that hasn't been generated is requested.
That seems like a bit much code without testing, let's see what functionality we currently have on the browser by running the project again.
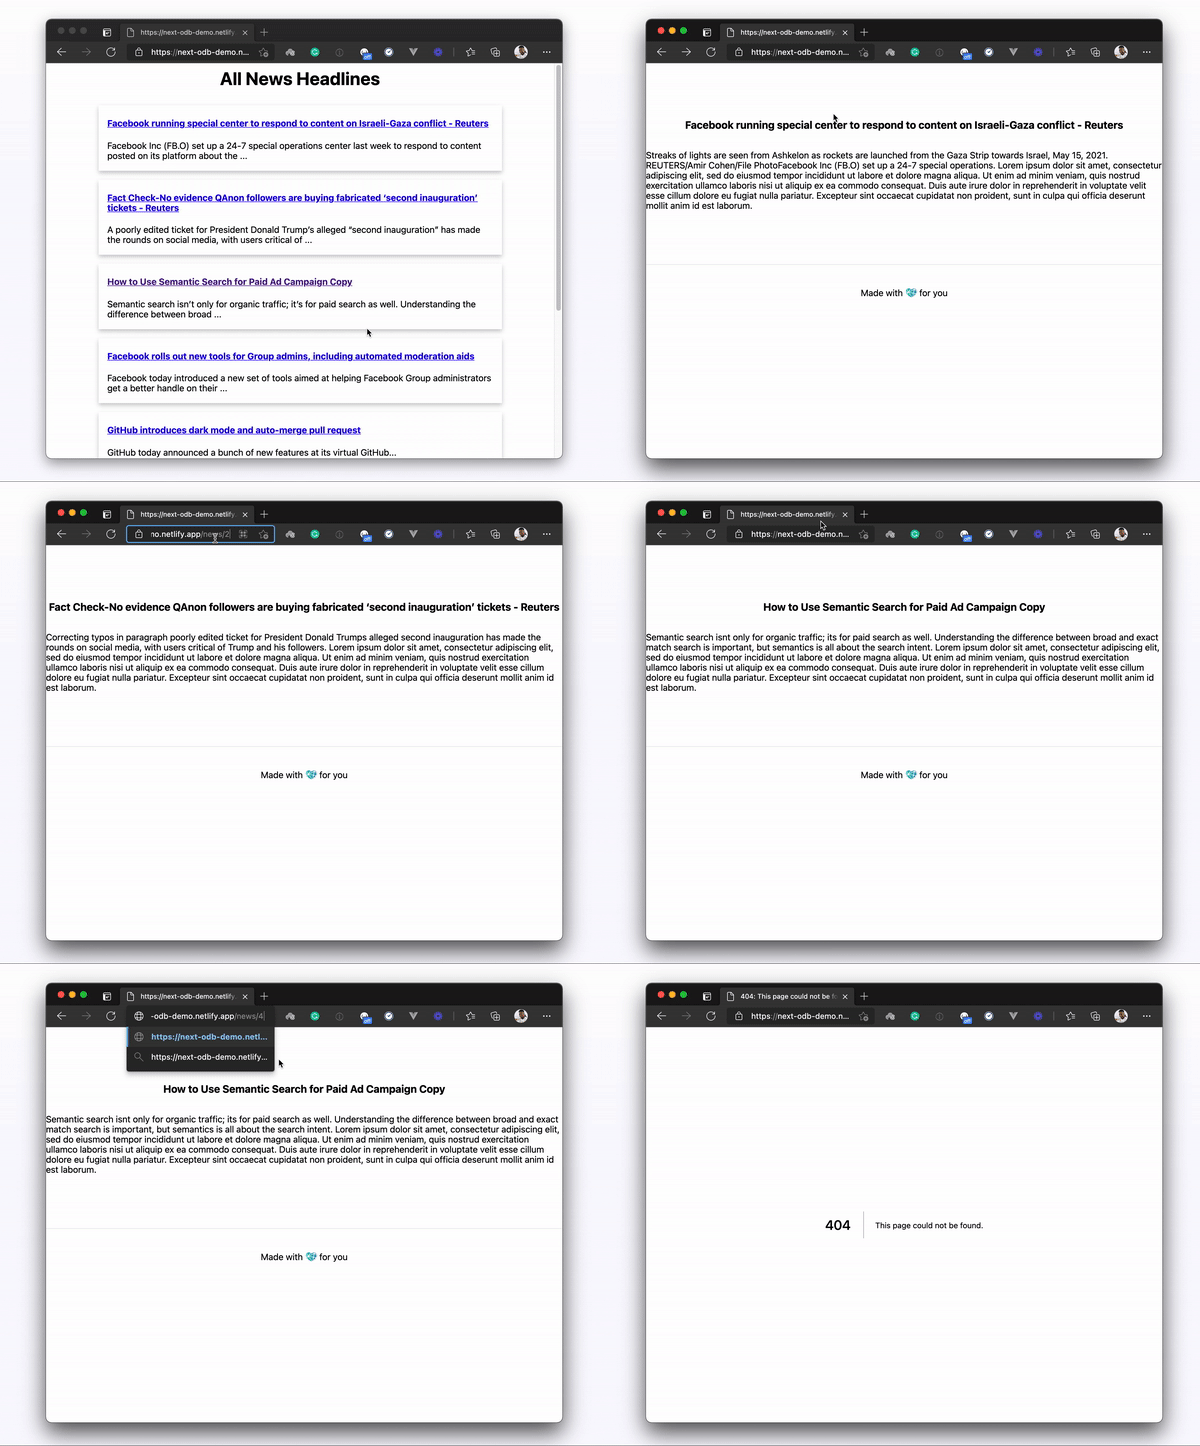
As expected, when we navigate to any of the pre-generated pages (breaking news - news/1, news/2, news/3) we see the news content and read it. However, if we request for any other news item (e.g archived news - news/4 or /5 etc) then we get a 404 page.
But that's not what we want. In line with the topic of this post, we want to use the On-demand builder function which is natively supported in Next.js on Netlify, to fetch any dynamic paths that we intentionally 'did not' generate at build time. And to achieve that, all we need to do is set the value of fallback to 'blocking' or true in the getStaticPaths() function like this:
// pages/news/[id].js
import Footer from "@components/Footer";
export default function NewsDetail({ news }) {
  return (
    <div>
      <main>
        <h3>{news.title}</h3>
        <p> {news.content} </p>
      </main>
      <Footer />
    </div>
  );
}
export async function getStaticPaths() {
  const res = await fetch(process.env.DATA);
  const newsItems = await res.json();
  const breakingNews = newsItems.filter((news) => news.tag == "breaking");

  const paths = breakingNews.map((news) => ({
    params: { id: news.id.toString() },
  }));

  /*
  console.log(paths)
  [
    { params: { id: '1' } },
    { params: { id: '2' } },
    { params: { id: '3' } }
  ]
  The paths above will be generated at build time
  */

  return { paths, fallback: "blocking" };
}

export async function getStaticProps({ params }) {
  const res = await fetch(`${process.env.DATA}/${params.id}`);
  const news = await res.json();
  return { props: { news } };
}
Setting fallback:"blocking" or fallback:true means that we are telling Next.js to use an On-demand builder function to generate any paths that are not already pre-generated and specified in the getStaticPaths() function. If we test this again, we should be able to see archived news (e.g news/4 and above):
As expected, we get the archived news pages now with ODB. The experience is that when our app runs, all our breaking news pages get generated at build time while our archived news pages get generated with ODB when they're first requested.
Every ODB response will be cached and subsequently served from the cache for any new requests. This will result in a much faster build time for the site and a far better experience for our end users.
And with that, I think you have all you need to go forth and use On demand builders in your Next.js applications. Like always, I look forward to seeing what you do and what breakthroughs you achieve with them.
PS You can try DPR with free Agility CMS starter.
Watch this workshop to learn how:
Other blog posts recommended for you:
How to start with Headless Commerce: Agility CMS, Next.js & Snipcart Tutorial
Putting your website behind a CDN like Akamai, Cloudflare or AWS Cloudfront
API vs SDK vs Webhooks Explained: Various Ways to Power a Headless CMS | Agility CMS


