Tutorial: Building an eCommerce Solution with AgilityCMS, Shopify, and StepZen. Part 2
Using Next.js Commerce


In a previous post, Using GraphQL to Unlock eCommerce Data for Frontend Teams, we explored some of the challenges of building a composable eCommerce platform — a platform built from best-of-breed systems instead of a monolithic suite. In addition, we introduced some concepts for what it takes to retrieve and link data from multiple systems and synchronize data between systems.
To bring this scenario to life, we combined data from a popular eCommerce system Shopify and Headless CMS Agility CMS.
Using a GraphQL API to bring these systems together provides more benefit than simply adding a best-of-breed CMS like Agility CMS to your Shopify eCommerce solution. It enables horizontal data integration, making it easy to add new backends to your system, and also dramatically simplifies bringing that data to new consumer experiences.
Overview
This post describes how and provides the sample code that you can run and extend. We created a single GraphQL API that encompasses all the backend systems we want to employ in our stack. We adapted our frontend to work as a frontend for a composable platform.
Our sample is built using:
- Next.js Commerce, an eCommerce framework built to provide a modern, Jamstack-capable frontend on top of a monolithic eCommerce platform
- AgilityCMS, a headless content management system with fast, flexible features and easy-to-use tooling for Enterprise grade eCommerce projects
- Shopify, a world-class eCommerce solution
This tutorial describes how to configure the site and deploy it to Vercel.
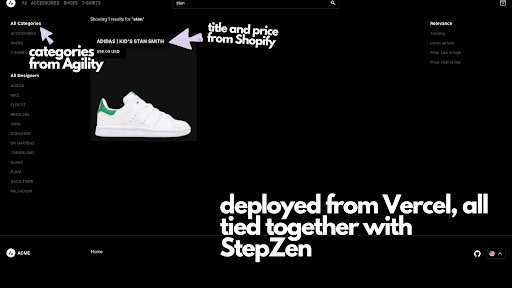
Here’s how our end result looks. See the running site here and read on to learn how to build it and get the sample code.
Get the Sample Code from the GitHub Repo
The code for our commerce site is in the following GitHub repo: Vercel Commerce StepZen.
We’ve taken Vercel’s eCommerce starter kit and given it a StepZen boost! You can see the StepZen-specific instructions in our readme. You may also want to review the readme for Vercel’s solution.
You can run it locally or see the deployed sample.
Prerequisites
To run this sample yourself, you need the following:
Accounts
- A StepZen account
StepZen allows you to easily create a secure GraphQL endpoint that connects to any backend. You’ll need an account for this tutorial. Get your free account here.
- An AgilityCMS account
- A Shopify account.
Note: To have the checkout/cart experience working, you need a basic plan or higher that is not in the 14-day trial period.
We expect that you are familiar with the Shopify and Agility CMS platforms.
Development environment
- macOS or Linux
- Node.js version 12 and above
- Install the StepZen CLI
Configuration and Deployment
Let’s get started! First, make sure you have the following defined in AgilityCMS:
You’ll need one content model. In Agility CMS, the content model defines the fields available to you when adding your content (for example, a Product).
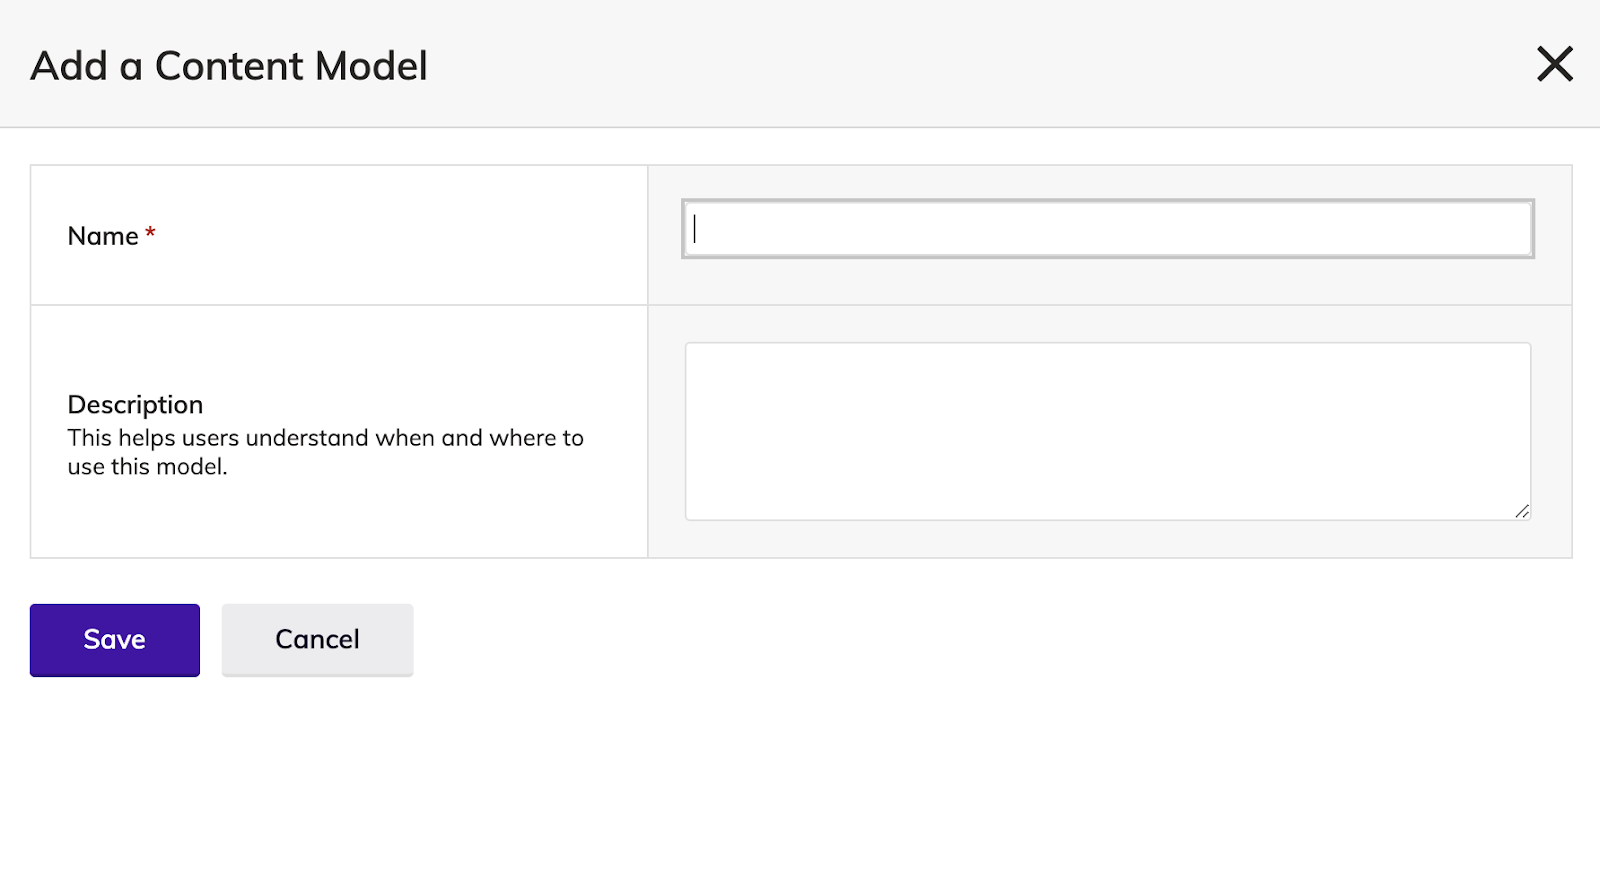
Model 1: Product
- title, Text field
- slug, Text field
- description, LongText field
- shopifyTitle, Text field
- shopifyId, Integer field
- vendor, Text field
- hero, a Boolean field
- type, DropDownList field
- image, Text field

These fields define the content types for your model. If you need to learn how to create a content model, Agility has a significant portion of its help center dedicated to it.
Adding Content to Shopify and Agility CMS
Now, there are two options to add content to your Shopify and Agility instances.
- Import products with csv and xlsx. We recommend importing products to eliminate user error and to get spun up quickly.
- Add content manually.
If you have an existing store that you want to connect to AgilityCMS, go to Step 3 of Option 1 to export your products.
Option 1: Import Products (recommended)
- Import this file to Shopify https://github.com/stepzen-samples/vercel-commerce-stepzen/blob/main/sample_products/import_products_to_shopify.csv
- Now that you have the data in your store, you must export it using EZ Exporter. This exports the product data with the ID associated (shopifyId in the Agility CMS), which is essential to making the GraphQL API we build on the Agility and Shopify data work.
- Now you must edit the data to align with the Content Model Products you created in Agility CMS. Add the two columns that we list below for you - this is the trickiest part, so compare your export with the file we shared earlier.
a. Agility_ContainerName with the field Products on each row.
b. Agility_ContentID that can be blank or added if you wish. Ensure that any Ids you add do not conflict with any existing products in Agility CMS. - After saving the .xlsx file, head over to Agility CMS and create a Products list under Content in the left-hand menu.

- Now that you have a list ready upload the .xlsx to the list.
Option 2: Alternative Import Products
If you prefer not to use the EZ Exporter method described above, you can import your products as follows.
- Import this file to Shopify and skip down to step 3 --> https://github.com/stepzen-samples/vercel-commerce-stepzen/blob/main/sample_products/import_products_to_shopify.csv
- Download this file and add the images (https://cdn.shopify.com/s/files/1/1234/5678/9101/products/12345678910.jpg?v=1623860271) and shopifyId (6789851971761) that were uniquely generated by your store.
You can get this data as follows: - Click the export button in the Products tab in the left-hand menu and copying the image URLs, then opening each product in the Products tab and grabbing the unique Id in the URL (https://store.myshopify.com/admin/products/6789851971761).
- Following Steps 3 and 4, and then copying the images and shopifyIds from that export into this file.
- After saving the .xlsx file, head over to Agility CMS and create a Products list under Content in the left-hand menu.
- Now that you have a list ready, upload the .xlsx to the list. Read more: Getting Started. Import Content
Done! Please skip the Manual Upload section.
Option 3: Manual Upload
Caution, this is prone to user errors
Go to Shopify’s site and add the products with a minimum of one variant that you want in their system. Export all the Products when done to add image URLs in the Agility CMS Product List. (https://cdn.shopify.com/s/files/1/1234/5678/9101/products/12345678910.jpg?v=1623860271)

Head over to Content and add as many instances in a Products list as you want. Each product should match the product created in Shopify, along with the shopifyId (6789851971761) that can be found in each product in the Shopify admin dashboard (https://store.myshopify.com/admin/products/6789851971761)
Set Up the eCommerce Site
Now that you have Agility and Shopify prepared, let’s set up the eCommerce site.
First, clone the repo:
git clone https://github.com/stepzen-samples/vercel-commerce-stepzen
This repository is a fairly standard next.js site. But there is one additional directory named stepzen, which contains the GraphQL schema definitions we deploy to StepZen.
This should look similar to the files in your Code Editor
🐒➔ tree
└── stepzen
├── index.graphql
├── types.graphql
├── queries.graphql
├── mutations.graphql
├── shopify-graphql.graphql
├── stepzen.config.json
└── config.yaml.sample
1 directories, 7 files
These files specify to StepZen how to turn the backends we are using into a unified GraphQL API. The *.graphql files are Schema Definition Language (SDL) that StepZen uses to convert REST and GraphQL calls into a combined schema. For more information, review the StepZen documentation.
Now we need to tell StepZen how to connect to our accounts (Shopify and Agility). The config.yaml file is used to configure StepZen with the correct information to access the back-end services.
Reminder: Make sure config.yaml is in your .gitignore
# config
/stepzen/config.yaml
Copy that sample to a new config.yaml like so:
$ cd stepzen
$ cp config.yaml.sample config.yaml
And now edit the config.yaml file, inserting your API keys and credentials where appropriate:
configurationset:
- configuration:
name: agility_config
header.Apikey: <agility defaultpreview Apikey>
instance: <agility instance>
- configuration:
name: shopify_config
Authorization: Basic <basic auth header>
store_name: <shopify store name>
- configuration:
name: shopify
header.X-Shopify-Access-Token: <shopify-access-token>
store_name: <shopify store name>
The name for each of these configurationsets represents how they are referenced in your schemas.
Agility Configuration
Under agility_config, we enter configuration data that tells StepZen how to talk to the Agility CMS API
header.Apikey,which is where you’ll put your Agility CMSdefaultpreviewApikey. Go to settings in your Agility CMS instance and copy the defaultpreview API key.- instance, specifying the Agility instance number. Go to settings and copy the Instance GUID under Global Security.
Shopify REST API Configuration
Under shopify_config we have configuration data that tells StepZen how to talk to the Shopify REST API:
- Authorization: Basic, which is where you’ll put your Shopify RestAPI authorization key.
- Under Apps in Shopify, select the link “Manage Private Apps”
- Enable Private App Development and Create Private App
- Name and provide Admin API Permissions to the App. The more read, write permissions you provide, the fewer permission errors to debug.
- Check “Allow this app to access your storefront data using the Storefront API” and Save.
- To generate a Base64 Basic API Key, go to Base64 Online, and paste the APIKey and Secret like so, Apikey:Secret. Click the Encode button, and paste the result in this config, Authorization: Basic. Phew, done!
store_namefor the Shopify store name.- Example:
testcanonicalstore
Shopify GraphQL API Configuration
Under shopify we have configuration data that tells StepZen how to talk to the Shopify GraphQL API:
- header.X-Shopify-Access-Token, which is where you’ll put your Admin API Shopify secret from above. Do not put your Shopify access token, this a bit tricky, but how Shopify wants it. We’ll use the STOREFRONT_ACCESS_TOKEN for the .env file.
- store_name for the Shopify store name
Note that we need both REST and GraphQL API connections to Shopify because the storefront id for the checkout process is only available via the GraphQL API.
Once you have edited config.yaml to contain the required information to connect to your accounts at Agility and Shopify, we’re ready to upload the configuration to StepZen.
Upload Configuration
We upload the configuration using the StepZen CLI. We can install that easily by running the following command in your terminal:
$ npm install -g stepzen
Note: Windows support for the CLI is currently in beta. We recommend using WSL on Windows.
You’ll need node to run this command as well.
Now log in to StepZen using:
stepzen login -a {ACCOUNT}
When prompted for your admin key, enter your admin key from your My Account page.
Now upload and deploy your schema by using the command:
stepzen start
Once you’ve deployed successfully you’ll get a message like:
Deploying to StepZen...... done
Successfully deployed /vercel/stepzen/ at 4:22:19 PM
Your endpoint is available at https://username.stepzen.net/vercel/stepzen/__graphql
Running the stepzen start command also launches StepZen’s GraphQL explorer, and we can run a query to verify that things are working.
Note If at this point you have no data in Agility or Shopify, you won’t see anything yet.
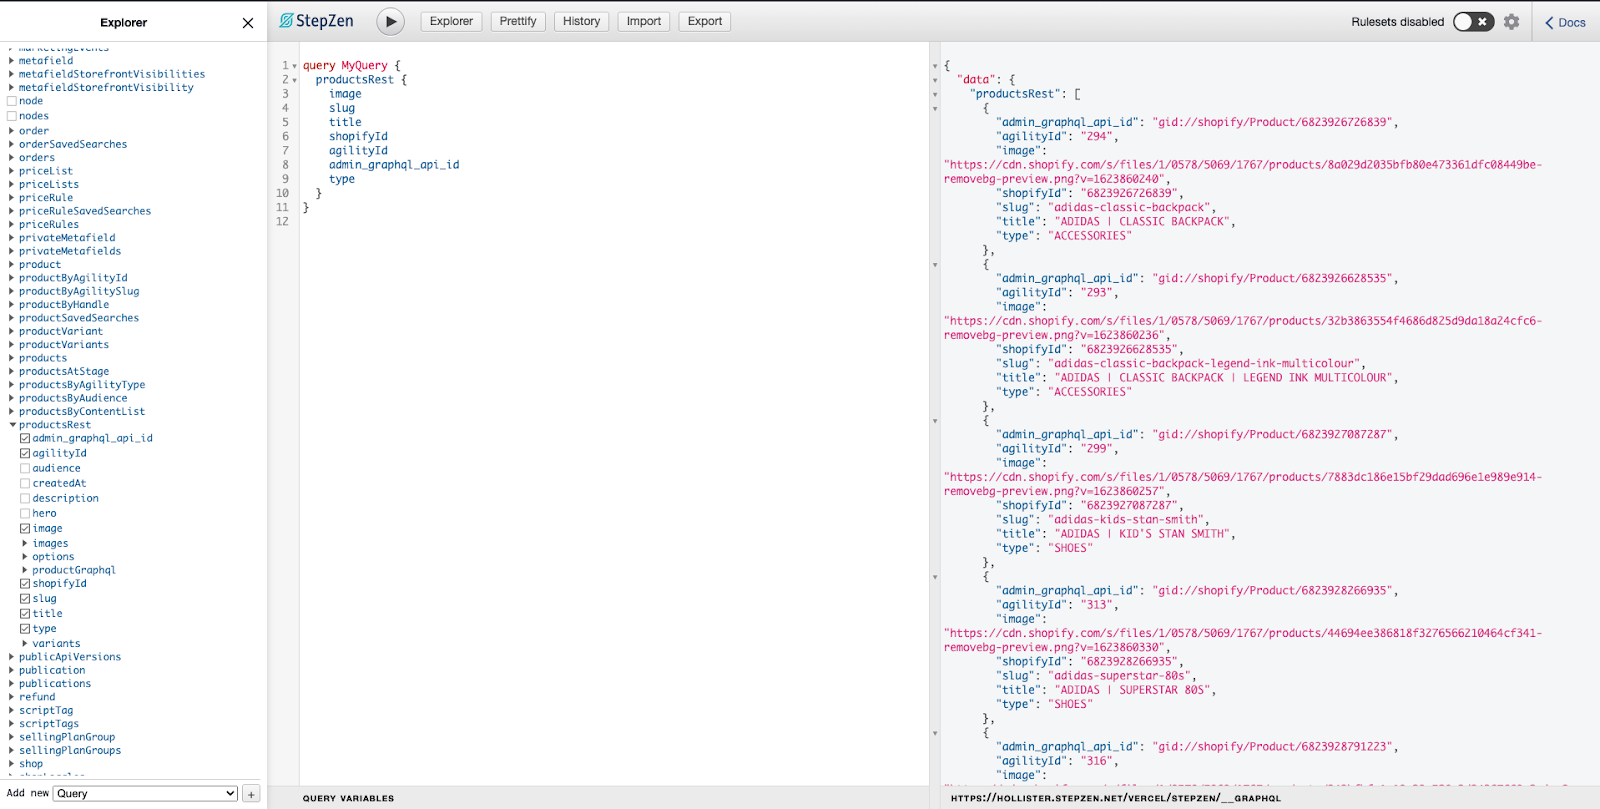
If you do have data, run the following query in the GraphQL explorer:
query MyQuery {
productsRest {
image
slug
title
shopifyId
agilityId
admin_graphql_api_id
type
}
}
The result looks something like this:
Now that the StepZen GraphQL API is running, we’re ready to run our site locally and optionally deploy it.
Running Locally
You’ll need to install and then run on development, using either yarn or npm.
Now we need to tell the frontend how to connect to our StepZen and Shopify Storefront API. This hides your keys - it also needs to be provided to Vercel when deploying the site.
Reminder: Make sure env.local is in your .gitignore
# config
.env
.env.local
Copy that sample to a new .env.local like so:
$ cp .env.template .env.local
And now edit the .env.local file, inserting your API keys and credentials where appropriate:
COMMERCE_PROVIDER=shopify
NEXT_PUBLIC_SHOPIFY_STORE_DOMAIN=yourstore.myshopify.com
NEXT_PUBLIC_SHOPIFY_STOREFRONT_ACCESS_TOKEN=
NEXT_STEPZEN_API_KEY=
NEXT_STEPZEN_API_URL=
Shopify Configuration
This is used for the search page, checkout, and payment processing functionality.
NEXT_PUBLIC_SHOPIFY_STORE_DOMAIN,which is where you’ll put your Shopify store URL.NEXT_PUBLIC_SHOPIFY_STOREFRONT_ACCESS_TOKEN,return to your private app and add the Storefront API access token. Please provide all read permissions to your access token.
StepZen Configuration
This is used for generating the products.
NEXT_STEPZEN_API_KEY,which is where you’ll put your StepZen ApiKey.NEXT_STEPZEN_API_URL,which is the endpoint generated by stepzen start. Example: https://username.stepzen.net/vercel/stepzen/__graphql
In the root directory for the project, run npm install and npm run dev:
$ npm install
...
$ npm run dev
Then, your project is available locally!
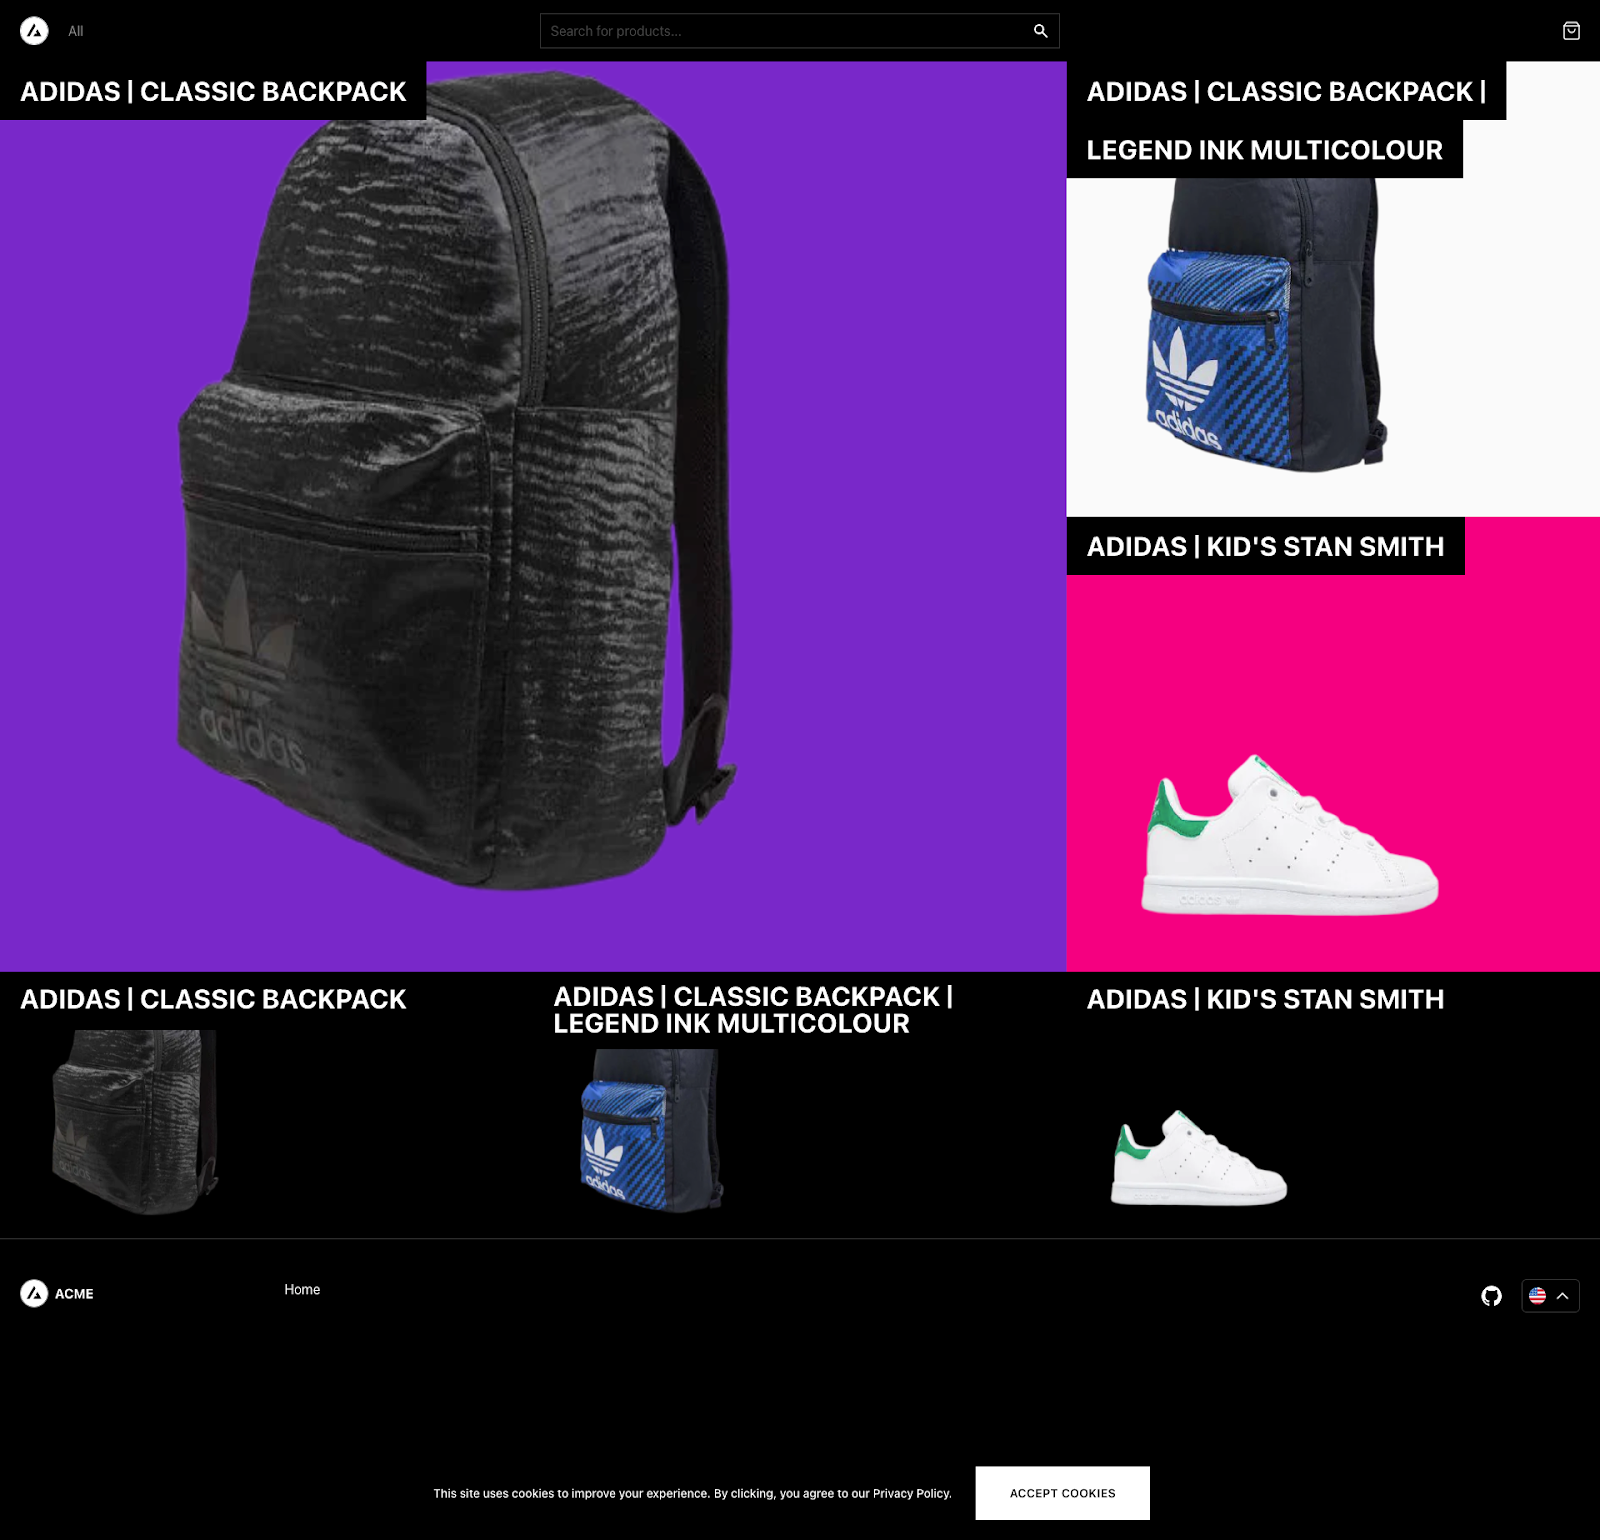
Open a browser and navigate to localhost:3000. You see a page similar to the following screenshot, albeit showing your data from your Agility and Shopify instances.
And now you have a composable digital experience platform running and ready to be deployed! If you followed our example, you have product information coming from both Agility and Shopify, all through a unified GraphQL API which makes front-end deployment easy. From here you can imagine adding additional capabilities, such as product reviews or personalization. Exposing those capabilities through a single GraphQL API endpoint makes adding them to your front end a much easier proposition.
Deploying to Vercel
Vercel is the deployment service that’s been optimized for Next.js.
Next.js allows you to create or update static pages after you’ve built your site. Incremental Static Regeneration (ISR) enables developers and content editors to use static-generation on a per-page basis, without needing to rebuild the entire site. With ISR, you can retain the benefits of static while scaling to millions of pages.
See the Next.js Docs for more information.
Practically speaking, that means you can prevent your website from crashing on Black Friday!
Let’s deploy it. Vercel can deploy automatically from a git repository, or directly from your computer using their CLI. Using a repository is the preferred way, but here we’ll use the CLI just to show you how it works.
Install the Vercel cli via npm:
npm i -g vercel
If you don’t have a Vercel account yet, sign up for one here: Vercel signup
Then, at the root of your project, log in to the Vercel CLI:
➔ vercel login
Vercel CLI 23.0.1
> Log in to Vercel github
> Success! GitHub authentication complete for **user**
Congratulations! You are now logged in. In order to deploy something, run `vercel`.
💡 Connect your Git Repositories to deploy every branch push automatically (https://vercel.link/git).
Next, link your local code to a project on Vercel by running the link command, accepting all the defaults:
$ vercel link
Vercel CLI 23.0.1
? Set up “~/vercel-commerce-stepzen”? [Y/n] y
? Which scope should contain your project? **username**
? Link to existing project? [y/N] n
? What’s your project’s name? vercel-commerce-stepzen
? In which directory is your code located? ./
Auto-detected Project Settings (Next.js):
- Build Command: `npm run build` or `next build`
- Output Directory: Next.js default
- Development Command: next dev --port $PORT
? Want to override the settings? [y/N] n
✅ Linked to **username**/vercel-commerce-stepzen (created .vercel)
Now that you have a project linked, we can set some environment variables in Vercel. The variables we need to set are the ones in your .env.local file. This ensures that the hosted project has the same environment variables used when running the project locally. We use the env command with the Vercel CLI to set variables:
🐒➔ vercel env add COMMERCE_PROVIDER
Vercel CLI 23.0.1
? What’s the value of COMMERCE_PROVIDER? shopify
? Add COMMERCE_PROVIDER to which Environments (select multiple)? Production, Preview, Deve
lopment
✅ Added Environment Variable COMMERCE_PROVIDER to Project vercel-commerce-stepzen [627ms]
$ vercel env add NEXT_PUBLIC_SHOPIFY_STORE_DOMAIN
Vercel CLI 23.0.1
? What’s the value of NEXT_PUBLIC_SHOPIFY_STORE_DOMAIN? *yourdomain*.myshopify.com
? Add NEXT_PUBLIC_SHOPIFY_STORE_DOMAIN to which Environments (select multiple)? Production
, Preview, Development
✅ Added Environment Variable NEXT_PUBLIC_SHOPIFY_STORE_DOMAIN to Project vercel-commerce-stepzen [429ms]
$ vercel env add NEXT_PUBLIC_SHOPIFY_STOREFRONT_ACCESS_TOKEN
Vercel CLI 23.0.1
? What’s the value of NEXT_PUBLIC_SHOPIFY_STOREFRONT_ACCESS_TOKEN? *yourtoken*
? Add NEXT_PUBLIC_SHOPIFY_STOREFRONT_ACCESS_TOKEN to which Environments (select multiple)? Production, Preview, Development
✅ Added Environment Variable NEXT_PUBLIC_SHOPIFY_STOREFRONT_ACCESS_TOKEN to Project vercel-commerce-stepzen [557ms]
$ vercel env add NEXT_STEPZEN_API_KEY
Vercel CLI 23.0.1
? What’s the value of NEXT_STEPZEN_API_KEY? *yourapikey*
? Add NEXT_STEPZEN_API_KEY to which Environments (select multiple)? Production, Preview, Development
✅ Added Environment Variable NEXT_STEPZEN_API_KEY to Project vercel-commerce-stepzen [464ms]
$ vercel env add NEXT_STEPZEN_API_URL
Vercel CLI 23.0.1
? What’s the value of NEXT_STEPZEN_API_URL? *yoururl*
? Add NEXT_STEPZEN_API_URL to which Environments (select multiple)? Production, Preview, Development
✅ Added Environment Variable NEXT_STEPZEN_API_URL to Project vercel-commerce-stepzen [505ms]
Finally, deploy your site to a new deployment by simply executing the deploy command. After a minute or two, your site is deployed and the CLI returns a link to the deployment!
$ vercel deploy
Vercel CLI 23.0.1
🔍 Inspect: https://vercel.com/**username**/vercel-commerce-stepzen/9CMjKiYzAdSKRFuvo5p3GXDaRYze [6s]
✅ Production: https://vercel-commerce-stepzen-weld.vercel.app [copied to clipboard] [2m]
📝 Deployed to production. Run `vercel --prod` to overwrite later (https://vercel.link/2F).
💡 To change the domain or build command, go to https://vercel.com/**username**/vercel-commerce-stepzen/settings
Conclusion
Thank you for following us on this journey. We hope you’ve enjoyed learning about how StepZen can tie together Shopify and AgilityCMS in the Next.js framework. We also hope the experience of using a large sample gives you an idea of how a GraphQL layer can decouple the frontend and backend and make for a smooth development process.
We’ve shown you how StepZen can be the data layer that connects various backends, which we believe can be a powerful enabling technology for composable experiences. We’d love to hear your ideas and see your code! Contact us on Discord or on Twitter.
(Carlos, Lucia, and Samuel are StepZen developers)
Keep reading: