What is your developer-dependent CMS actually costing you? Calculate your costs and get a full report


Developing with Locales
Multi-Locale Guide
Still choosing between locales, locale-specific sitemaps and separate instances? Start with Choosing a Localization Strategy. This guide covers what happens once your locales exist.
Setting up your locales
Locales are configured under Settings → Locales. Adding, renaming, reordering and disabling locales is covered in Locales. This guide assumes your locales already exist, and focuses on what happens after that.
Two things about locale setup matter specifically when you are building against the API.
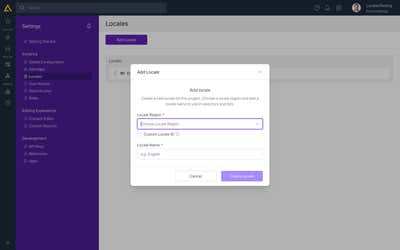
The locale code is what your code will use. The Locale Region dropdown assigns a standard code (for example es-mx for Mexico). If you need a non-standard code, tick Custom Locale ID and define your own. Whatever code ends up here is the exact string your API requests must use.
The region dropdown searches by code, not by language name. Typing Spanish returns nothing. Type es to see all Spanish-speaking regions, or es-mx to jump straight to Mexico.
Choosing your locale context strategy
When building your front end, you need to decide how locale context is determined for incoming requests. There are three common approaches.
1. Locale code in the URL
The locale code is the first path segment:
https://mysite.com/en-us/about-us
https://mysite.com/es-mx/about-us
This is the most common approach for JAMstack sites. It makes the active locale explicit and crawlable by search engines.
JAMstack / Next.js: locale routing is handled in your application code. See Multi-Locale Support with Next.js for a full implementation guide.
Legacy .NET sites: locale-in-URL routing must be enabled under Settings → Development Framework.
2. Separate domain per locale
Each locale is mapped to its own domain or subdomain:
https://en.mysite.com/about
https://es.mysite.com/about
To configure this, go to Settings → Sitemaps and click Add a Sitemap to create a sitemap for each locale's domain. In the Sitemap Details panel, enter a Name and Reference Name, then click Setup Deployment to attach your domain.
3. Cookie-based locale
The active locale is stored in a browser cookie. This keeps URLs locale-agnostic but requires client-side logic to read and set the cookie. It is handled entirely in your front-end code and needs no configuration in Agility.
Fetching locale-specific content
When making requests to the Content Fetch API, the locale code is part of the URL path:
GET https://{guid}-api.agilitycms.cloud/{guid}/fetch/{locale}/list/{referenceName}
For example, to fetch a content list in Spanish (Mexico):
GET https://b4cc94dc-api.agilitycms.cloud/b4cc94dc/fetch/es-mx/list/posts
The locale code must match exactly one of the codes configured under Settings → Locales. Requests using an unrecognised locale code will return an error.
Sitemaps per locale
The sitemap is fetched per locale too:
GET https://{guid}-api.agilitycms.cloud/{guid}/fetch/{locale}/sitemap/flat/{channelName}
GET https://{guid}-api.agilitycms.cloud/{guid}/fetch/{locale}/sitemap/nested/{channelName}
A page's slug can differ by locale, so build each locale's routes from that locale's own sitemap. To link a page to its translation (for a language switcher or hreflang), match on pageID, plus contentID for dynamic pages. Multi-Locale Support with Next.js shows both.
Copying content into other locales from code
Two Management API approaches create content in another locale:
- Initialize and Translate copy pages, content lists or content items into other locales in one batch, as they are or machine-translated. See Copy and Translate Content Across Locales with the API.
- Saving with the same ID writes your own values into the target locale as a connected copy. See Creating Content and Pages in Other Locales.
Connected Copies
Connected Copies link the same content item across locales, so that each language version is understood to represent the same piece of content.
Shared contentID. Connected copies share the same contentID across all locales. If you have a contentID from a query string or URL parameter, you can use it to retrieve that content in any configured locale.
Language switching. When editing a content item that has connected copies, switching locale using the language dropdown opens the connected copy in the other locale.
Independent content. Editing a connected copy in one locale does not affect the others, unless the field is marked Constant across all languages in the content model. Fields flagged as constant, such as a reference code or a sort order, are shared across every locale copy: updating the value in one updates it everywhere.
Related resources
- Locales, for adding, renaming, reordering and disabling locales
- Multi-Locale Support with Next.js
- Content Fetch API
- Choosing a Localization Strategy
- Copy and Translate Content Across Locales with the API
- Copying and Translating Content Across Locales, for editors
On this page