What is your developer-dependent CMS actually costing you? Calculate your costs and get a full report


Personalization
A/B/n Testing in Agility CMS
A/B/n testing lets you serve different versions of content to different visitors and measure which performs better. In Agility CMS, each variant is managed as content. PostHog controls which variant each visitor sees.
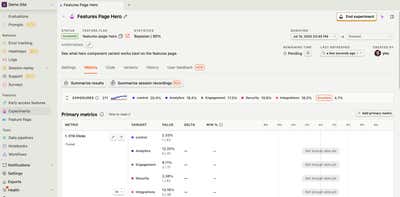
A/B/n testing lets you serve different versions of content to different visitors and measure which performs better. In Agility CMS, each variant is managed as content. PostHog controls which variant each visitor sees and tracks the results.
This guide uses the Next.js Demo Site as a reference implementation. You can see a live test running at demo.agilitycms.com/features, with full source code at github.com/agility/nextjs-demo-site-2025.
Why Component-Level Testing
Most A/B testing tools treat a page as the unit of experiment. You test Page A against Page B. That works, but it creates several problems: tests are slow to set up, require developer involvement for every change, and can only isolate one hypothesis per page at a time.
Agility CMS enables testing at the component level. Any component on any page can be independently enrolled in an experiment. This is a meaningful shift.
You can test what actually moves the needle. A hero headline, a CTA label, a pricing layout, a trust badge, a testimonial block -- these are the elements that drive conversion. Testing them individually produces cleaner signal than page-level tests where multiple variables interact.
Content editors own the variants. Because variants are content items in Agility CMS, editors can create and modify them without touching code. A developer wires up the component once. After that, running a new experiment is a content operation.
Multiple experiments can run simultaneously. A hero component can be in one experiment while a feature grid on the same page is in another. Each is tracked independently. You accumulate learning across your site rather than waiting serially.
Optimization goals are flexible. Component-level experiments are not limited to conversion. You can optimize for:
- Conversion -- form submissions, purchases, sign-ups, CTA clicks
- Engagement -- scroll depth, time on page, video plays, accordion opens
- Retention -- return visits, session depth, reduced bounce
- Revenue -- average order value, upsell rate, plan upgrades
PostHog lets you set a primary goal metric per experiment and track secondary metrics alongside it. A hero test might optimize for cta_clicked as its primary goal while also tracking scroll_milestone to understand whether a variant affects downstream engagement.
How It Works
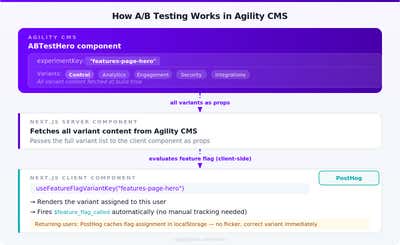
Three layers work together: Agility CMS stores all variant content, a Next.js server component fetches it at build time, and a client component lets PostHog decide which variant to show each user.
Client-Side vs Server-Side Evaluation
The demo site uses client-side feature flag evaluation. This is a deliberate choice, not a technical constraint. Both approaches work with Agility CMS.
Client-side evaluation (demo site approach)
Flag evaluation happens in the browser after hydration. The server renders all variant content into the page, and the client component selects which one to display after PostHog evaluates the flag.
| Consideration | Client-Side |
|---|---|
| Route rendering | Static (PPR-compatible) |
| Initial paint | Control variant, then swap |
| Performance | Faster overall (static + hydration) |
| Complexity | Lower -- PostHog React hooks handle it |
| Caching | Fully cacheable at CDN/edge |
The trade-off: users assigned to a non-control variant will briefly see the control before the swap. This is mitigated with a skeleton loader (see Flicker Mitigation) and PostHog's localStorage caching for returning users.
Server-side evaluation
Flag evaluation happens on the server before the response is sent. The correct variant is in the initial HTML. No swap, no flicker.
import { getFeatureFlagVariant } from '@/lib/posthog/get-feature-flag-variant'

// In a Server Component or Route Handler
const variant = await getFeatureFlagVariant(flagKey, distinctId)
In Next.js App Router, reading cookies or headers to identify the user at request time opts the route into dynamic rendering. That disables static generation, Partial Prerendering, and edge caching. For most content pages, client-side evaluation produces better overall performance. Server-side evaluation makes sense when the component involves server-only logic, or when showing the wrong variant even briefly is not acceptable.
Choose based on your requirements. Both patterns work with the content model described below.
Prerequisites
- Agility CMS instance with the PostHog App installed
- A PostHog account (Cloud or self-hosted)
- Next.js 16 with the App Router (the demo site runs 16.3). The PostHog setup below uses
instrumentation-client.ts, which needs Next.js 15.3 or later.
Step 1: Content Model Setup
Component content model
Your testable component needs two fields beyond its regular content:
| Field | Type | Description |
|---|---|---|
experimentKey | Text | Must match the PostHog feature flag key exactly |
variants | Linked Content (Nested Grid) | List of variant content items |
The main component fields serve as the control variant. No separate content item is needed for it.
Variant content model
Create a model for variant items. At minimum it needs:
| Field | Type | Description |
|---|---|---|
variant | Text | Must match a PostHog variant key exactly (e.g. analytics, engagement) |
Add any fields that differ between variants. In the demo site's ABTestHero, variants each have their own heading and description.
Naming conventions
Consistent naming across PostHog and Agility CMS is critical. A mismatch between the experimentKey field and the PostHog flag key is the most common setup error.
| Item | Convention | Example |
|---|---|---|
| Feature flag key | kebab-case | features-page-hero |
| Control variant | control | control |
| Other variants | descriptive kebab-case | analytics, engagement |
CMS experimentKey | Must match flag key exactly | features-page-hero |
CMS variant field | Must match PostHog variant key | analytics |
Managing variants in the CMS
Once your component is set up, editors manage variants directly in the content editor. The Control tab shows the default content fields. The Variants tab lists all the alternative versions being tested.
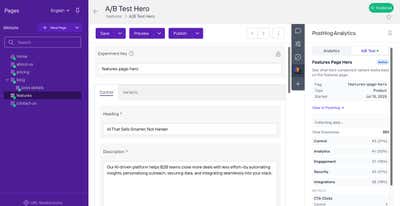
The right-hand PostHog Analytics panel shows the live experiment status, traffic split, and key metrics directly in the Agility CMS interface -- no need to open PostHog separately to check on a running test.
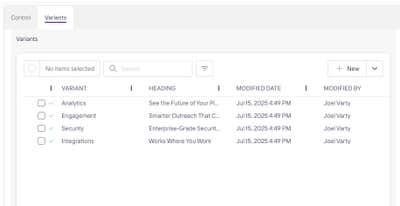
Each variant is a published content item with its own heading and description. Editors can add, edit, or remove variants without touching code.
Step 2: Create the Experiment in Agility CMS
The PostHog App for Agility CMS includes a built-in experiment wizard. You do not need to switch to the PostHog dashboard to set up an experiment.
When you add an experimentKey to a component but no experiment exists yet in PostHog for that flag key, the analytics panel shows a prompt to get started.
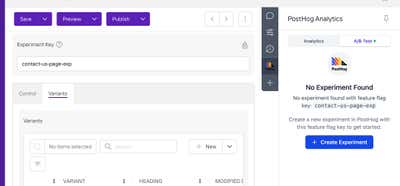
Click + Create Experiment to launch the three-step wizard.
Step 1: Choose experiment type
The wizard detects your variants automatically and presents four experiment templates.
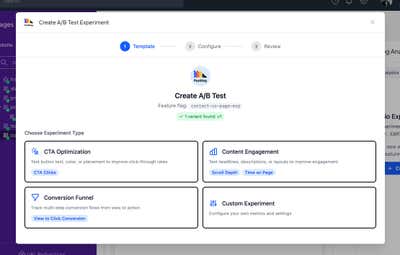
| Template | Optimizes for | Default metrics |
|---|---|---|
| CTA Optimization | Click-through rate | CTA Clicks |
| Content Engagement | Time on page, scroll depth | Scroll Depth, Time on Page |
| Conversion Funnel | Multi-step conversion | View to Click Conversion |
| Custom Experiment | Anything you define | You configure |
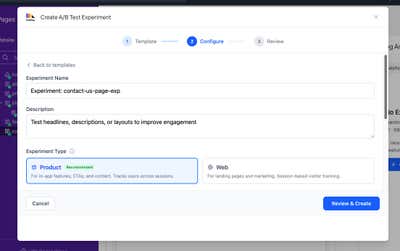
Step 2: Configure
Name the experiment and choose whether it is a Product experiment (tracks users across sessions) or a Web experiment (session-based, suitable for landing pages and marketing).
Step 3: Review and create
The review screen confirms the feature flag key, experiment type, traffic allocation, variant list, and goal metrics before creating the experiment in PostHog.
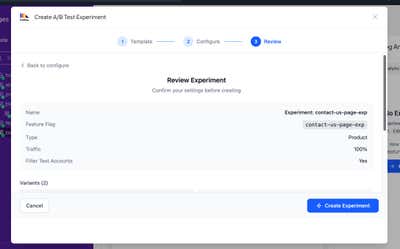
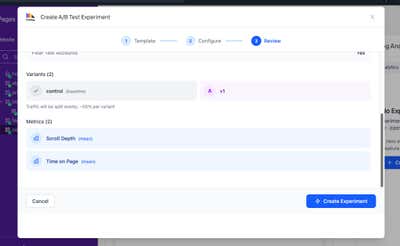
Click Create Experiment to create the feature flag and experiment in PostHog simultaneously. The experiment is now linked to your component content in Agility CMS.
Step 3: PostHog SDK Setup
Install the package
npm install posthog-js
Initialize PostHog
Initialize in instrumentation-client.ts so it runs once on the client:
import posthog from 'posthog-js'

const postHogKey = process.env.NEXT_PUBLIC_POSTHOG_KEY
const postHogHost = process.env.NEXT_PUBLIC_POSTHOG_HOST

if (postHogKey && postHogHost) {
  posthog.init(postHogKey, {
    api_host: postHogHost,
    defaults: '2025-05-24'
  })
  window.posthog = posthog
}
Required environment variables
NEXT_PUBLIC_POSTHOG_KEY=phc_xxxxxxxxxxxxxxxx
NEXT_PUBLIC_POSTHOG_HOST=https://us.i.posthog.com
Step 4: Component Implementation
Server component
The server component fetches all variant content and passes it to the client. All variants arrive in the initial HTML payload -- the client just picks which one to show.
// ABTestHero.tsx
import { getContentItem, getContentList } from '@agility/nextjs'
import { ABTestHeroClient } from './ABTestHeroClient'

export const ABTestHero = async ({ module, languageCode }) => {
  const { fields, contentID } = await getContentItem({
    contentID: module.item.contentID,
    languageCode,
  })

  const variantsList = await getContentList({
    referenceName: fields.variants,
    languageCode,
  })

  // Main component fields are the control variant
  const controlVariant = {
    variant: 'control',
    heading: fields.heading,
    description: fields.description,
    cTALabel: fields.cTALabel,
    cTALink: fields.cTALink,
  }

  const allVariants = [controlVariant, ...(variantsList?.items || [])]

  return (
    <ABTestHeroClient
      experimentKey={fields.experimentKey}
      allVariants={allVariants}
      contentID={contentID}
    />
  )
}
Client component
// ABTestHeroClient.tsx
'use client'

import { useFeatureFlagVariantKey, usePostHog } from 'posthog-js/react'
import { useState, useEffect } from 'react'

export const ABTestHeroClient = ({ experimentKey, allVariants, contentID }) => {
  const posthog = usePostHog()
  const flagVariant = useFeatureFlagVariantKey(experimentKey)
  const [isReady, setIsReady] = useState(false)

  useEffect(() => {
    if (flagVariant !== undefined) {
      setIsReady(true)
    }
  }, [flagVariant])

  const controlVariant = allVariants.find((v) => v.variant === 'control')
  const selectedVariant = isReady
    ? allVariants.find((v) => v.variant === flagVariant) || controlVariant
    : controlVariant

  if (!isReady) {
    return <SkeletonHero />
  }

  return (
    <section data-variant={selectedVariant.variant} data-agility-component={contentID}>
      <h1>{selectedVariant.heading}</h1>
      <p>{selectedVariant.description}</p>
      <a
        href={selectedVariant.cTALink}
        onClick={() =>
          posthog?.capture('cta_clicked', {
            experimentKey,
            variant: selectedVariant.variant,
            contentID,
            label: selectedVariant.cTALabel,
          })
        }
      >
        {selectedVariant.cTALabel}
      </a>
    </section>
  )
}
File structure
src/components/agility-components/ABTestHero/
├── ABTestHero.tsx        # Server component: fetches all variant content
├── ABTestHeroClient.tsx  # Client component: evaluates flag, renders variant
└── index.ts              # Re-exports
Step 5: Choosing a Goal Metric
Set your primary goal metric when creating the experiment in the wizard. Common patterns by optimization type:
| Optimization Goal | Event | When to Fire |
|---|---|---|
| Conversion | cta_clicked | On button/link click |
| Conversion | form_submitted | On successful form submit |
| Engagement | scroll_milestone | At 25%, 50%, 75%, 100% scroll depth |
| Engagement | time_milestone | At 30s, 60s, 120s on page |
| Engagement | video_played | On video play |
| Revenue | purchase_completed | On order confirmation |
| Revenue | plan_upgraded | On subscription change |
PostHog fires $feature_flag_called automatically when useFeatureFlagVariantKey is called. Exposure tracking is handled for you. Only the conversion and engagement events need custom instrumentation.
Flicker Mitigation
When using client-side evaluation, users assigned to a non-control variant will briefly see the control before PostHog evaluates the flag. The demo site handles this with a skeleton loader that prevents a jarring content swap.
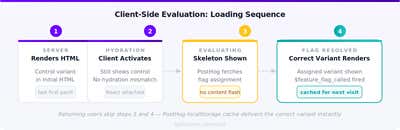
// Show skeleton while PostHog evaluates the flag
if (!isReady) {
  return <SkeletonHero />
}

// Show correct variant once evaluation is complete
return <ActualHero variant={selectedVariant} />
Analyzing Results
Results are visible in two places.
In Agility CMS: The PostHog Analytics panel in the content editor right sidebar shows live experiment status, total exposures, variant traffic breakdown, and key metrics without leaving the CMS.
In PostHog: For deeper analysis, go directly to the PostHog Experiments view. The demo site's live "Features Page Hero" experiment shows what a running A/B/n test looks like at scale.
The dashboard shows Bayesian statistics at 95% confidence, per-variant conversion rates, delta from control, and win probability. The Summarize results and Summarize session recordings buttons use PostHog AI to generate plain-language experiment summaries.
Custom funnel in PostHog
For multi-step conversion analysis:
- Step 1:
$feature_flag_calledwhere$feature_flag = your-experiment-key - Step 2: your conversion event (e.g.
cta_clicked) - Breakdown by:
$feature_flag_response
Experiment Design
Test one thing at a time. Each experiment should test a single hypothesis. If you change the heading and the CTA label simultaneously, you cannot tell which change drove the result. Variants are content items, so you control exactly what differs.
Let the test run to completion. Stopping early when one variant looks like it is winning is a well-documented source of false positives. PostHog calculates required sample size before launch. Respect it.
Document the hypothesis before you launch. Write down what you expect to happen and why. This prevents post-hoc rationalization and builds institutional knowledge over time.
Run multiple experiments in parallel. Because Agility CMS tests at the component level, you can have several experiments running simultaneously on different components on the same page. They do not interfere with each other.
Troubleshooting
Variant never changes
- Confirm
experimentKeyin Agility CMS matches the PostHog flag key exactly (case-sensitive) - Check PostHog is initialized (browser console: "Initializing PostHog")
- Clear localStorage and reload -- PostHog caches flag assignments per browser
$feature_flag_called not appearing in PostHog Live Events
- Verify the experiment is running, not paused
- Check you are not excluded by the Filter Test Accounts setting
Always seeing control
- You may simply be assigned to the control group (statistically expected)
- Override locally via the PostHog toolbar: Feature Flags > Toggle
Events not appearing immediately
- PostHog batches events and flushes roughly every 30 seconds or on page unload
- This is expected behaviour in development
Reference
On this page