What is your developer-dependent CMS actually costing you? Calculate your costs and get a full report


Vibe Coding
From Brief to Working Site: The Vibe Coding Workflow
The ten-step workflow for vibe coding an Agility site: feature map, starting point, modeling through MCP, real content, components, brand, preview and Web Studio, deploy, demo script and handoff, with typical times and prompts.
This is the workflow behind the proof-of-concept builds described in Vibe Coding with Agility. It takes you from whatever brief you have (a discovery call outline, an RFP, a scoring spreadsheet, a call transcript) to a deployed Agility site that editors can preview and edit in Web Studio, plus the script you need to show it.
It assumes you've connected the Agility CMS MCP server and the Agility Knowledgebase MCP server to your AI coding tool. If you haven't, follow Building an Agility Site with AI Coding Tools first.
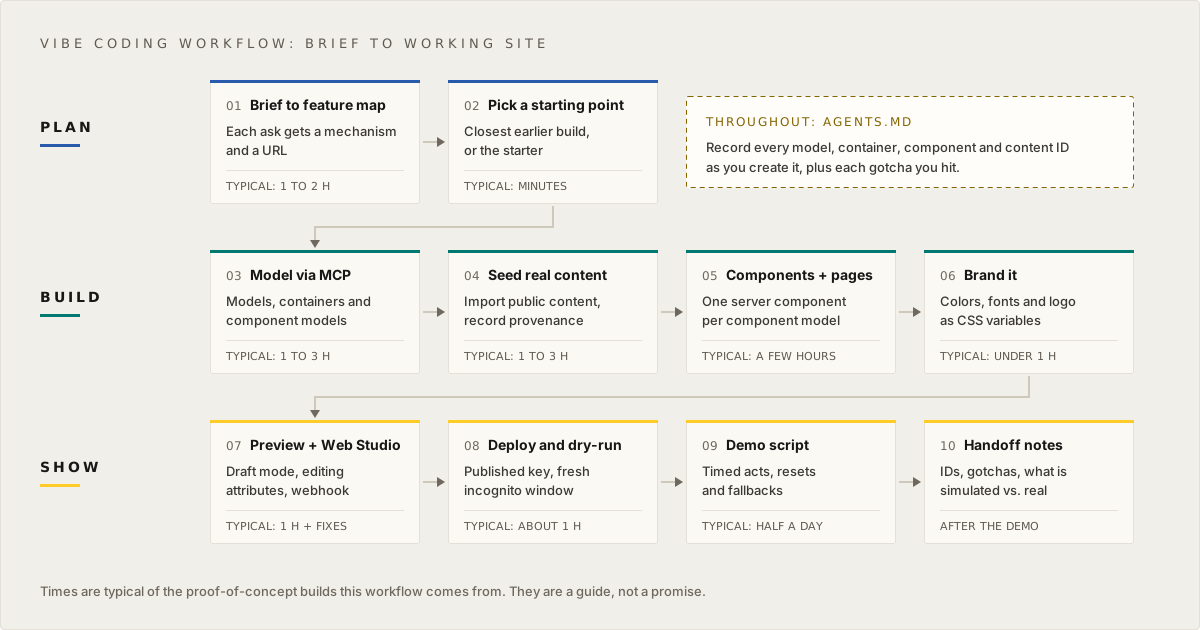
The times below are typical of the builds this workflow comes from. They are a guide for planning, not a promise. Expect your first build to take longer.
1. Turn the brief into a feature map
Typical time: 1 to 2 hours.
Before any code, have the AI tool turn the brief into a plan document with one row per ask. Each row says how important the ask is, the mechanism that delivers it (a content model, a component, a shared block, a personalization rule, or "talk track only, not built") and the URL where it can be seen once it's built. Anything the brief says isn't needed goes in a "deliberately left out" list.
Cap the build at four to six headline features. Every extra feature costs build time, and more importantly demo time.
Read the brief in docs/brief/ and write docs/plan.md.
Make a table with one row per requirement: requirement, priority,
mechanism (content model, component, shared block, personalization,
or "talk track only, not built"), and the URL where it will be visible.
List anything the brief marks as not needed under "Deliberately left out".
Recommend at most six headline features. Don't write any code yet.
Review this plan yourself. It's the cheapest place in the whole workflow to cut scope.
2. Pick a starting point
Typical time: minutes.
Don't start from a blank folder. Copy the closest thing you've already built and keep its plumbing: the data layer with cache tags, routing, preview, the revalidation webhook, the component registry, typed environment variables and the AGENTS.md. If you don't have a previous build yet, start from the Agility Next.js Starter, which gives you all of that on Next.js 16 with the App Router.
Then remove what belongs to the previous project: its components, its sample content assumptions, its brand. Leftovers from a previous build are easy to miss, so ask for a cleanup pass explicitly.
This repo was copied from a previous Agility build. Keep the data layer,
routing, preview, the revalidate webhook, the component registry and
the env module. List every component, page model assumption, brand
asset and piece of copy that belongs to the previous project, and
remove them. Update AGENTS.md so it no longer describes the old project.
3. Model the content through the MCP server
Typical time: 1 to 3 hours.
Some setup is still done by a person in the Agility app: creating the instance, API keys and the sitemap. Once those exist, the AI tool can create content models, containers and component models through the MCP server. Create the page model and its content zones through the MCP server (with save_page_model), or in the Agility app.
Two rules keep this step clean:
- Map every component model field 1:1 to a React prop. The component then has no translation layer to get wrong.
- Record every ID as you go. Each model, container, component model and seed content item goes into the instance ledger in
AGENTS.mdthe moment it's created. See Writing an AGENTS.md for Agility Projects.
Using docs/plan.md, design the content models and component models
for the headline features. Before creating anything, list the existing
models (get_content_models, get_component_models) and reuse any that fit.
Show me the proposed models and fields first.
After I approve, create them through the Agility MCP server, read each
one back to confirm the real field names, and add every model,
container and component model ID to the ledger in AGENTS.md.
Read MCP and Agility Gotchas before this step. Several of the gotchas there, such as normalized reference names and saves that blank omitted fields, show up here first.
4. Seed real content, and record where it came from
Typical time: 1 to 3 hours.
A site filled with the project's own content is far more convincing than one filled with placeholder text, and it tests your content model against reality. Have the AI tool import the public content you have permission to use, upload the matching media, and save it all as content items.
Keep a provenance file. For every piece of content, record whether it came from the source (and when it was collected), was written new, or is invented sample data. That file keeps the demo honest and tells the next person what has to be replaced.
Import the public pages listed in docs/sources.md into the models we
created. Upload images to the media library and use the returned URLs.
Save items with null release and pull dates. Don't publish anything.
Write docs/content-provenance.md listing each item, its source URL,
the date collected, and whether it is copied, rewritten or invented.
Add the seed content IDs to the AGENTS.md ledger.
For large or structured imports, script the transformation instead of pasting content into the conversation. Migrating Content into Agility with an AI Agent covers that in depth.
5. Build the components and pages
Typical time: a few hours.
Build one async server component per component model and register it, following the starter's pattern: the component receives its content ID, fetches its own fields through the project's data layer (so the request gets a cache tag), and fetches any linked list separately by reference name. Every rendered field carries its Web Studio attribute from the start, because retrofitting them later is slow.
For each component model in the AGENTS.md ledger, build a server
component in components/agility-components/ following the existing
component pattern, and register it. Use the data layer for every read.
Add data-agility-component on the root, data-agility-field on every
rendered field and data-agility-nested-listitem on each list item.
Then create the pages in docs/plan.md on the Main page model and add
the components to them. Run npm run build and fix any errors.
6. Brand it
Typical time: under an hour.
Apply the brand's colors, fonts, logo and favicon as CSS custom properties, and make every component read its colors from those variables. For a demo, this is the single biggest lever for making a site feel custom for the effort it takes.
Apply the brand from docs/brand/: define the colors and fonts as CSS
custom properties in the global stylesheet, swap in the logo and favicon,
and replace any hard-coded colors in components with the variables.
Check text contrast against WCAG AA and list anything that fails.
7. Wire preview, Web Studio and the publish webhook
Typical time: about an hour, plus fixes.
This is what makes the site an Agility site rather than a static mockup:
- Preview uses draft mode and the preview API key, so editors see saved changes before publishing. See Setting Up Preview and Preview URL Lifecycle.
- Web Studio relies on the
data-agility-*attributes from step 5. Expect a round of fixes: a wrong attribute opens the wrong editor or lets an edit overwrite the wrong text. Agility Decorate can add and check the attributes for you. - The publish webhook calls your revalidate route so a publish shows up on the live site in seconds, without a rebuild. See Webhooks.
Keep the webhook's signature check in place even for a demo. If you do switch it off to get unblocked, write that down in AGENTS.md as something to restore. See Verifying Signed Webhooks.
8. Deploy and dry-run
Typical time: about an hour.
Deploy to your host, set the environment variables, register the webhook and the preview deployment in Agility, then rehearse the whole demo:
- Use a fresh incognito window, so no draft-mode cookie hides a problem.
- Check the site against the published fetch key. In development the starter uses the preview key, so "it works locally" can hide content that was never published.
- Publish a change and watch it arrive. If it takes about a minute instead of seconds, the cache tag your data layer sets and the tag your webhook revalidates don't match.
9. Write the demo script
Typical time: half a day or more.
A demo needs a script as much as a site. Split it into timed acts, each with one point to make, the URLs to open, and what to click. Add pre-flight checks, how to reset content between runs, and a fallback for each act if something fails live.
Write docs/demo-script.md as a run of show for a 30-minute demo.
Split it into timed acts, one per headline feature in docs/plan.md.
For each act give the point it makes, the exact URLs, the clicks and
the edits to make in Agility or Web Studio, and a fallback if it fails.
Add a pre-flight checklist and steps to reset the demo content.
A strong finale is to edit live content with a prompt through the MCP server and show the change arrive on the site.
10. Write the handoff notes
Typical time: after the demo.
Whoever picks the project up next (a colleague, a partner, the customer's developers, or you in three months) needs to know what's real. Write a short handoff document covering:
- The instance ledger: every model, container, component model and content ID.
- What is simulated: mocked sign-in, mocked membership lookups, sample data, external systems that were faked.
- What was deliberately left out, from the feature map.
- The gotchas you hit, so they go into the next build's
AGENTS.md. - What has to change before production. Start from From Proof of Concept to Production.
Related
- Vibe Coding Playbooks by Use Case: content model ideas and starter prompts for common use cases.
- Writing an AGENTS.md for Agility Projects
- MCP and Agility Gotchas to Know Before You Build
On this page